This information can be found in the Workshop Manual, TSD4400 in Section G4/1-1 Please do not attempt any work on the hydraulic system without reading or being able to refer to this manual.
Step-By-Step Procedure (2 Persons Required)
Procedure to De-pressurise the system
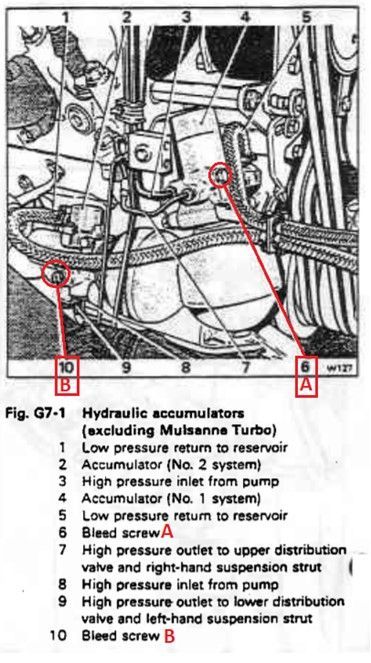
Step 1. Open the bleed screws A and B (see Fig. G4/1-1) one full turn on both accumulators (see below Fig. G7-1) there is no bleed tube required as these bleed internally and allow sufficient time for the mineral fluid to return to the reservoir.
Step 2. Switch on the ignition and check that ‘1 Brake Pressure’ and ‘2 Brake Pressure’ warning lights on the dashboard are illuminated.
Step 3. De-pressurise the rear struts/dampers at bleed screw N (see Fig. G4/1-1), attach a bleed tube and bleed until fluid is free of air bubbles, once free of air bubbles close bleed screw.
Step 4. Open the bleed screws A and B on the accumulators and start and run the engine at 1500rpm for 1 minute, check the warning lamps as described in Step 2. are illuminated.
Step 5. Switch off the engine.

Bleeding procedure, for below steps refer to above diagram Fig. G4/1-1.
Step 1. Close bleed screws A and B
Step 2. Attach bleed tube to bleed screw C and open to allow fluid to flow until fee of air bubbles, close bleed screw C. (right hand drive cars only)
Step 3. Attach bleed tubes to bleed screws D, E and F and depress the footbrake pedal and start engine and run at 1000rpm.
Step 4. Allow bleed screws D, E and F to bleed until free of air bubbles.
Step 5. Attach bleed tubes to bleed screws G and H to bleed until free of air bubbles.
Step 6. Close bleed screws D, E and F.
Step 7. Attach bleed tubes to bleed screws J and K to bleed until free of air.
Step 8. Close bleed screws G and H.
Step 9. Attach bleed tubes to bleed screws L and M to bleed until free of air.
Step 10. Close bleed screws J and K.
Step 11. Close bleed screws L and M.
Step 12. Release footbrake.
Step 13. Put the car on the ground, add weight to the rear of the car, use your assistant to sit in the boot/trunk to compress the suspension and activate the levelling valves.
Step 14. Allow the systems to pressurise, check both warning lights on the dashboard are extinguished.
Step 15. Attach a bleed tube to bleed screw N and bleed until free of air bubbles.
Step 16. Close the bleed screw N.
Step 17. Check hydraulic reservoir levels and top-up where necessary.
Step 18. Switch off the engine.
Step 19. Make sure all bleed screw dust covers are re-fitted.