Question: Can anyone give me a brief "how to" on dismantling the Rear RAM Piston assembly to replace the seals with the Flying Spares seal kit? I have got it out of the car and on the bench...but I can't seem to separate the piston rod from the housing. I have removed the internal circlip and plug with o-ring.....I can see a nut deep inside the piston rod....but I'm a bit flumoxed....it might be something to do with the fact its 42ºC here, and I am having brain fade. Or I'm just dumb. Would be great to get Uncle Monty back on the road.
Answer: I worked it out, through deciphering the over floral language in the original workshop manual.
Here in layman's terms.
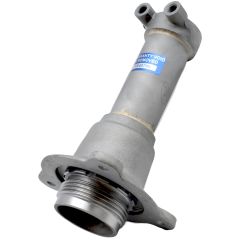
1) Remove the two 7/16 Hydraulic Hoses Unions at the top of the ram. Mark with tape or sharpie which one is which.
2) Remove the three retaining bolts and convex washers to the ram assembly. The ram may be under a little pressure.
3) Pry up the ram housing with either a screwdriver or hardwood pry. This will reveal the castellated nut. (I had to remove the wiring harness clip to get that extra few millimetres)
4) Loosen the castellated nut anti clockwise. Special tool is recommended but I found that a pair of Wide Jawed Piped Grips worked, without damaging the nut.
5) The whole top of the ram housing will now be able to be removed towards you if you compress the ram to it's limit. It's as tight as ....well very tight thing.
6) Clean the assembly with degreaser or meths.
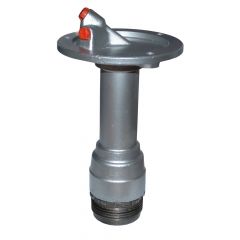
7) On later cars in this series you will see a circlip inside the piston retaining a plug with a 1/4 threaded hole in the centre. Remove the circlip and withdraw the plug. The 1/4 hole is so you can screw a special tool into it to withdraw. Mine fell out with a tap on a wooden bench.
8) Inside the piston if you peer in with a torch or bright sunlight you will now see a 5/8 nut. Place the ram and piston on sturdy bench or in a soft jawed vice and remove this nut anti-clockwise. This is a long nut within a long tubular sleeve.
9) The piston should now withdraw from the housing.
10) Wash & clean everything in Degreaser or Meths.
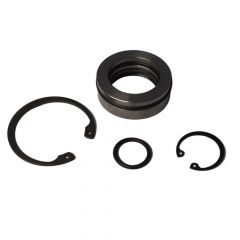
11) Open your Flying Spares replacement kit.
12) On the piston plug remove the o-ring and thoroughly clean. In my case it was slightly corroded so a few minutes with a light emery paper and meths and it cleaned up well. Replace the o-ring with the new one in the kit. I then lightly smeared the plug with grease and set to one side.
13) Next, on a bench remove circlip that retains the oil seals, then the oil seals in the ram housing with a seal pick. Again my ram housing was slightly corroded so after removal I went over with meths and a light emery to refinish. Be gentle.
14) Wash the housing make sure it's clean and pop in the new seal assembly. The F/S kit is a rather clever arrangement that requires nothing more that placing the whole assembly in the ram housing (The solid metal face should be facing you) and pressing it home. Keep it level and even. If you feel resistance at the end, a wooden drift or if that's not available a large socket and a wooden, leather mallet and a gentle tap should suffice. Replace with the new circlip.
15) Replace the piston through the new seal in the housing with a very light smear of grease, press it home. Now replace the tube and piston retaining bolt coupling the piston/ram and the housing together.
16) Now press the piston plug into the ram, and replace with the new circlip. Again I tapped gently with a drift to seat the plug.
17) Clean everything with a meth soaked rag.
18) Replacing the Ram Housing:- Again the ram has to be fully home to even attempt fitting back to the car. Offer up the housing with the line/unions facing the right direction. Once in place I found that lifting the housing as high as possible, and levering down the castellated nut from below to match with the car was possible with a long flat head screwdriver.
19) Carefully align the castellated nut with the car and screw in.
TIP:- As my seal had failed, brake fluid had leaked into the well below, which stopped the castellated nut screwing down completely (it was "hydraulicing") So clean out the well with paper towels and meths so no fluid remains) This, and cleaning the threads will make a huge difference to the next stage. In fact it will be the difference between success and failure)
20) Tighten down the castellated nut. Again I found that wide jawed slim long handled pipe grips did this as well as could be expected in the absence of the correct tool. I did not damage the nut at all.
21) Replace the three housing bolts and convex washers. Here was also a problem. The car has no shifted so the holes may not line up as you would imaging. I used wood pads and a short pry bar to alight the ram housing. It was an interesting and swear filled few minutes. Be careful not to cross thread the bolts. Tighten down evenly, each one at a time.
22) Reconnect the hydraulic lines making sure you know which one went where.
23) Refill and bleed the system.
I wont go into that as it's not part of this thread...but in a nutshell. Both front wheel calipers and both rear suspension valves need to be done. You should be good to go.
I will add here that when bleeding..both front axle/wheel "rear calipers" need bleeding.
and that my dears is that....
Hopefully that might help someone.